
Imagine you’re in a public place, and someone near you collapses, showing no signs of life. Would you know what to do? Your ability to respond effectively in such a scenario could be the difference between life and death. That is where Cardio Pulmonary Resuscitation, commonly known as CPR, comes in. CPR is a life-saving technique used during emergencies when someone’s heartbeat or breathing has stopped. It could happen during a heart attack, near-drowning, or electric shock.
Everyone needs to understand how this critical procedure works and, preferably, undergo CPR training. CPR can double or even triple the chances of survival after cardiac arrest. So, knowing how to perform CPR is invaluable, whether you’re a medical professional, a caretaker, a teacher, or a good Samaritan. See what it takes to perform CPR with this step-by-step guide here.
Understanding the Importance of CPR Training
You might be thinking, “Why do I need CPR training?” You may believe that emergencies are rare or that there will always be someone else around who knows what to do. However, when it comes to CPR, seconds matter. The longer the human brain goes without oxygen, the more damage it incurs.
CPR training is essential because it gives you the skills and confidence to act promptly and effectively in an emergency. During a CPR training course, you learn to perform chest compressions, provide rescue breaths, and use an automated external defibrillator (AED). It’s not just about knowing the steps; it’s about being able to perform them under pressure.
Moreover, CPR training is an investment in your community. By learning CPR, you’re equipping yourself to save a life —maybe even someone you love. The more people know CPR, the safer that community is.
When is CPR Necessary?
CPR is necessary when a person’s heart stops beating, or breathing becomes ineffective, such as during cardiac arrest. When this happens, oxygenated blood isn’t being circulated to the brain and other vital organs, which can lead to death within minutes.
Some signs that a person may need CPR include unconsciousness, no pulse, and no signs of breathing (or only gasping). It’s important to note that gasping is not effective breathing and is a common sign of cardiac arrest.
If you’re unsure whether a person needs CPR, it’s better to err on the side of caution and start the procedure. Any attempt at CPR is better than no attempt. If it turns out the person didn’t need CPR, you can stop once they show signs of life, such as breathing on their own, coughing, or moving.
The Basics of CPR: A Step-by-Step Guide
The basics of CPR consist of pushing hard and fast in the center of the chest and giving rescue breaths. Here’s a step-by-step guide:
- Check the scene and the person: Ensure that the scene is safe for you to approach, then check the person. Tap or shake their shoulder and shout, “Are you OK?” to ensure they need help.
- Call 911 or ask someone else to do so: If the person is unresponsive, call 911 immediately. If you’re not alone, ask someone else to call 911 while you begin CPR.
- Open the airway: Tilt the person’s head back slightly to lift the chin.
- Check for breathing: Listen closely for no more than 10 seconds. If there is no breathing or only gasping, begin CPR.
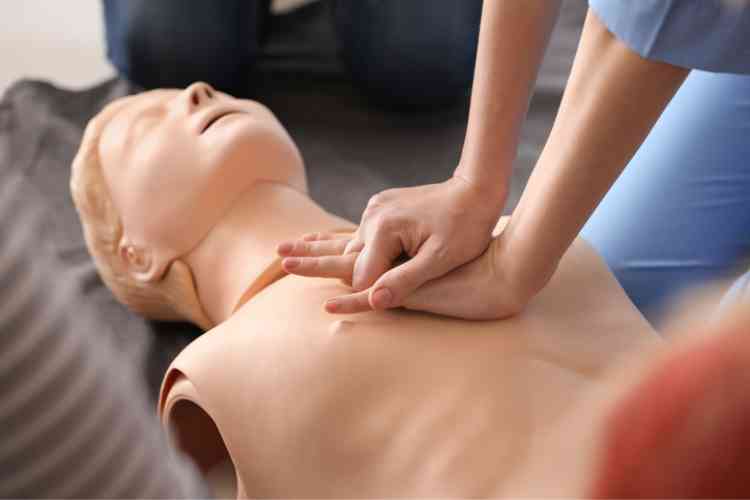
- Give chest compressions: Kneel beside the person and place the heel of one hand in the center of the chest. Place your other hand on top and interlock your fingers. Keeping your elbows straight, compress the chest hard and fast, at least 2 inches deep and at a rate of 100 to 120 compressions per minute.
- Give rescue breaths: If you’ve been trained in CPR and feel comfortable doing so, give two rescue breaths after every 30 chest compressions.
Remember, if you’re not confident giving rescue breaths, you can perform hands-only CPR. These are chest compressions without rescue breaths, which can still be effective in saving a life.
CPR for Adults: Detailed Steps
CPR for adults follows the general steps outlined above, with a few additional considerations. For example, if you’re alone and didn’t witness the person collapse, perform CPR for two minutes before calling 911. That is because they could have been down for a while, and immediate CPR is crucial.
When giving chest compressions, use both hands and push hard and fast in the chest’s center, at the breastbone’s lower half. The compressions should be at least 2 inches deep and at a rate of 100 to 120 compressions per minute.
When giving rescue breaths, ensure the person’s airway is open (tilt their head back slightly and lift the chin), pinch their nose shut, and breathe into their mouth until their chest rises. Give two breaths after every 30 compressions.
CPR for Children: What’s Different?
CPR for children aged one to puberty is similar to adult CPR, but a few differences are owing to their smaller size and different physiology.
Use only one hand (or two if the child is larger) for chest compressions. The compressions should be about 2 inches deep, at a rate of 100 to 120 compressions per minute.
For rescue breaths, you’ll still give two breaths after every 30 compressions, but you may not need to breathe as hard to make the chest rise. Again, if you’re not confident giving rescue breaths, hands-only CPR is better than no CPR.
CPR for Infants: Special Considerations
Infants (under one year of age) require special considerations for CPR due to their tiny size and fragile bodies.
Instead of using your hands for chest compressions, use two fingers (your index and middle fingers) to compress the chest about 1.5 inches deep at a rate of 100 to 120 compressions per minute.
Cover both the infant’s mouth and nose with your mouth for rescue breaths and give gentle breaths until you see their chest rise. As with adults and children, give two breaths after every 30 compressions.
Automated External Defibrillators (AEDs) and CPR
An AED device can detect irregular heart rhythms (like those during cardiac arrest) and deliver a shock to restore a regular heartbeat. AEDs are crucial in the chain of survival, as they can increase the chances of survival significantly.
If an AED is available, it should be used as soon as possible. After turning the AED on, follow its voice prompts. If the AED advises a shock, ensure no one touches the person before you press the shock button.
After the shock, or if the AED does not advise a shock, continue with CPR until the person shows signs of life or trained medical help arrives.
Common Mistakes in Performing CPR
While any attempt at CPR is better than no attempt, it’s important to be aware of some common mistakes.
One mistake is not pushing hard enough or fast enough during chest compressions. Compressions should be hard and fast to pump blood to the brain and other vital organs effectively.
Another mistake is not ensuring the person’s airway is open when giving rescue breaths. Always tilt the person’s head back slightly and lift the chin to open the airway.
Lastly, don’t stop CPR too soon. Continue until the person shows signs of life or until trained medical help arrives.
CPR is a life-saving skill that everyone should know. You can gain the skills and confidence to act swiftly and effectively in an emergency through proper CPR training, potentially saving a life. Remember, the most important thing is to act. Even if you’re not confident, any attempt at CPR is better than no attempt. Let’s make our communities safer by learning and promoting CPR.